Yoga is one of the most holistic forms of physical activity. It is also the only exercise that actively encourages self-exploration on every front – body, mind and soul. There is a yoga pose or sequence for almost every ailment under the sun. It comes as no surprise then that there is also yoga for periods. Your body goes through many changes when you have your period. Yoga respects that and the postures that are recommended for periods work with your body to make you feel better.
 It is impossible to cover each and every yoga pose for periods. There are thick volumes dedicated to the subject. The information contained in this article should not be considered as comprehensive. If you are a beginner with no health problems, then the poses contained herein should suffice for the time being. Note that you are a beginner even if you have been practicing everyday for over two years. If you have a medical condition, then consult with your yoga teacher for a customized sequence that has been modified taking into account your special needs.
Should You Do Yoga When You Have Your Period?
Many women hesitate about exercising in general when they have their periods. Since yoga is such an intense form of physical activity, they question the wisdom of practicing yoga during periods even more.
Studies have shown that exercise can help to reduce the symptoms of pre-menstrual syndrome (OMS) or at least cause a significant decrease in their intensity. For example, if you feel bloated a few days before your period or during your period, exercise can help you feel less so. Plagued by headaches? Exercise can make them disappear. Unfortunately, not many women know this and they will actively avoid exercise when they have their period, precisely when their bodies need it the most.
You’ve probably read a yoga book or two on the subject and realized that even the pros don’t have the answer to this one. There are some schools of though which advise against doing inversions, which we will look at a bit more closely in a bit. There are others that advocate ceasing yoga altogether and practicing only the simplest of poses. Then there are some who advise that you should go on as normal.
Although several books, websites and teachers will say different things, it all boils down to you. How do you feel? What are your energy levels like? Can you focus on what you are doing? Will you enjoy your practice during your period?
You may not think that yoga is a very strenuous form of physical activity, but it does indeed require concentrated physical and mental effort to get the poses right. If you are up to it, then by all means go ahead and practice yoga during you periods. However, remember that the way you feel during one of the times you have your period should not be used as a benchmark for all the times that you are menstruating. For example, you may have your period and feel like you can run ten miles, that’s how great you feel. So you may think ‘OK, I suppose I’m one of those women who can totally do yoga during my periods so this is what I should stick to.’ But there may be a point in time when you may feel a little low during your period and you push yourself to do yoga anyway because you have formed a rule about it.
Yoga is first and foremost about listening and connecting to your body. Your body is different every single day, from moment to moment. It’s not just your period but several other things going on in your life which also affect your body when you are menstruating. Since each day is different, how your body feels will be different too. Listen and work with your body. If you normally feel great but aren’t feeling so good this time around, postpone your practice to a day when you are up to it. On the other hand, if you generally have low energy levels during your period but feel awesome for some reason during one of the times you have your period, don’t hesitate to roll out your yoga mat and stick to your practice.
Inversions During Periods
If you have been doing yoga even just for a few days, your yoga instructor may have told you to avoid inversions if you have your period. This is a widely held view. Here are the reasons generally given for avoiding inversions during periods.
- During periods, most women are low on energy as the body directs its resources elsewhere. Hormonal changes within the body mean that you may feel fatigued, irritated and unfocused. Plus, there is period pain to deal with. The mental and physical strain on your body is already quite high. Some women feel this acutely, others not so much. Inversions require a high level of energy. They require immense mental and physical effort. This can be quite strenuous and leave you feeling drained after. Yoga is indeed meant to be a form of exercise, but it is not meant to fatigue you to the point of exhaustion, which is exactly what some women who are particularly sensitive during their periods will feel after their yoga practice. This is the main reason that inversions and some other more advanced poses are generally not advised during periods.
- Yoga is about directing your body’s energies into healing and restoration. The poses are designed to respect your body’s natural flow of energy. During your period, the menstrual flow is seen as energy going downward. Those advising against inversions at this time maintain that going upside down goes against the body’s normal flow and is not conducive to the body’s natural way. They feel that inversion will disrupt the flow of energy and cause problems which may not be discernible but which nevertheless occur.
The inversion poses which several yoga teachers say should be avoided during periods include Sirsasana or Head Stand and Sarvangasana or Shoulder Stand.
Many people argue though that there are poses like Adho Mukha Svanasana (Downward-Facing Dog) or Uttanasana (Standing Forward Bend) which also invert the uterus, but these are not excluded during periods. So the ideology behind banning one type of inversion while letting others be done is hazy. Most teachers who argue one over the other may perhaps be influenced by their personal experience. Again, it comes down to you. Do you feel up to inversions? Are you feeling strong enough to hold the pose? There’s no point doing it for the heck of it if you are feeling drained. Straining your body is never the end goal of yoga and you should definitely avoid inversions if you don’t think you can do it. If you feel like you can though, go ahead and give it a try. Your body will then tell you whether or not it is OK for you to do them. You may not feel so good after your practice or you may feel wonderful. Perhaps you need to do the inversion for a shorter period of time. Listen and decide for yourself.
You may find this lack of assertive guidance frustrating, but the truth is that it is a blessing in disguise as it teaches you to trust yourself and take responsibility for your choices.
(Disclaimer: The yoga poses in this article are meant for general informational purposes only and should not substitute the advice of a health professional or yoga instructor. Every person is different and has different needs depending on his or her health and constitution. For best results, get a checkup from your doctor and seek guidance from a qualified yoga instructor who will customize the yoga poses/sequence, if needed, to suit your individual situation.)
Before You Begin
- Wear comfortable clothing while you practice. Don’t wear clothes that are too tight or too loose. Wear fabrics like cotton which can breathe.
- Invest in a yoga mat. You can practice on the floor, but it will prove to be too hard and even cold. You will soon get uncomfortable and want to quit. You can use a blanket for padding but this can give a bit of an uneven surface and you want an even surface to practice on. A yoga mat provides padding, protection from the coldness of the floor, plus it gives you a better grip so you will not slip or slide while trying to practice.
- It is recommended to have a bath before and after your practice.
- Keep a pillow or a bolster handy. These are meant for support. You can do your postures without them too but you will find greater relief and restoration if your use the props.
- Some postures require yoga blocks and yoga straps. You can get these for reasonable prices at any sports store.
Yoga for Period Pain
Stomach cramps and back ache are the bane of most women’s periods. Period pain is something that most of us do not know how to deal with. Sometimes the pain can get so bad that it leaves you bed-ridden. No amount of pill-popping helps. Many women do not like having to rely on medication to relieve their pain anyway.
It’s not surprising then that most yoga poses for periods are designed to alleviate pain. If you are interested in learning natural ways to lessen period pain, then yoga is a good road to take. There are several yoga poses and sequences that work with your body and significantly reduce pain, especially while in the posture.
It’s all about loosening the muscles in the pelvis. Your pelvis is where most of the pain originates – the lower back and the stomach. By stretching the front of the body and through certain twists, you can loosen the muscles and help your body to better deal with your cycle.
There are several yoga poses which will help to loosen the pelvis and which will greatly alleviate most of the discomfort experienced during periods. Here are the names plus a short description of how to do them. Note that the descriptions are just meant as a guideline. There are several alignments that you have to do to safely get in and out of a posture or you could hurt yourself. Ask your yoga instructor about the alignments or get your hands on a reputed yoga book to learn more about them.
Setu Bandha Sarvangasana (Supported Bridge Pose)
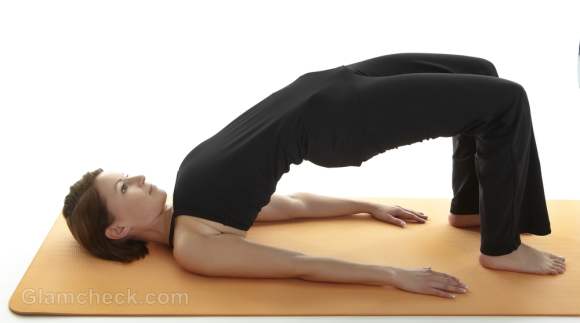 Setu Bandha Sarvangasana
This is without a doubt one of the best poses overall to do when you have your period. It opens up your pelvis, stretches the front of the body, provides immense relief from stomach cramps and calms you like nobody’s business. It is also very relaxing if yoga blocks are used for support. There are two variations of the supported bridge pose – one with a block and one with a yoga strap. You can use a strip of strong cloth in place of a strap. As for the block, you should get a proper yoga block for this one, preferably made of foam.
The initial steps of getting into the posture are similar.
- Lie down on your mat with your knees bent, hip width apart. Your feet should be as close to your buttocks as you can get them. You should at least be able to touch your heels with your fingertips.
- Your palms should be facing down and your neck should be elongated.
- Lift your hips. Then lift your lower back. Your feet will want to move forward while your knees will start to spread. Avoid this. Try to control your movements. Your feet should be planted exactly the way you positioned them in step one while your knees should be hip width apart and facing forward, not jutting out at an angle. Continue to raise your hips and back until your upper back is also off the ground.
- You’ll feel a little compressed on your neck. You can make breathing easier by lifting your sternum (upper chest) and pushing it outward. You should now be resting on your shoulders.
- Step 3 and step 4 actually happen simultaneously. Immediately after, you roll your shoulders in and clasp your outstretched hands under you.
With the Strap
Take a yoga strap and loop it over your ankles, the ends of each strap should be in each of your hands. Make sure the clasp of the strap is not against the skin of your ankles or hands as this will start to hurt pretty soon and will distract you from your practice. You should be holding the strap as close to your feet as possible. This will help you create a stronger arch with your back and will allow your pelvis to open up better.
With the Block
Take a foam yoga block in a standing position. Raise your pelvis a little higher so that you can get the yoga block under you. Place it under the small of your back. Lower your pelvis on to it. So now your lower back is resting on the yoga block. This will feel wonderfully restorative! Return your hands to their outstretched position and clasp. Stay in this posture for at least five minutes. You can stay for fifteen to twenty minutes if you want to. It is very relaxing and you will feel a significant reduction in period pain after this.
Paschimottanasana (Full Forward Bend)
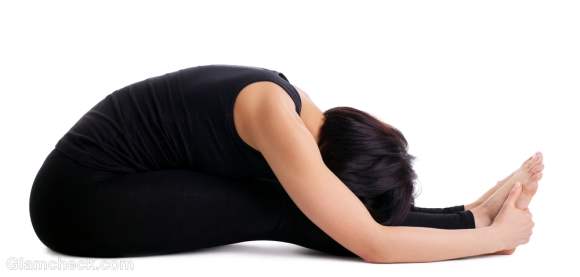 Paschimottanasana
The full forward bend is a calming, restorative pose. Even in a regular yoga practice, it is often done towards the end to calm the body and relax the mind. Full forward bends will help with cramps as they stretch the back. They can also reduce heavy bleeding during periods.
- Sit down on your yoga mat, your legs outstretched.
- Hold your left foot with your left hand and your right foot with your right hand.
- Bend forward and try to bring your head to rest on your knees. Keep your elbows facing downward, not jutting out to the side. Take a couple of deep breaths.
- Rise back into a seated position. Repeat.
Supta Baddha Konasana (Butterfly Pose)
Here’s one you probably loved to do as a child without knowing that it’s a yoga pose. The butterfly pose opens up your groin, assists in loosening pelvic muscles and allows your lower back to find relief.
1. Lie down on your yoga mat.
2. Place a pillow under your lower back for support.
3. Now bring together the soles of your feet so that your knees are jutting out to either side of you.
4. Do NOT move your knees up and down the way you did as a child. This is not received very well by the body.
5. Simply stay in this pose for about ten minutes. Take deep breaths, focus on different parts of the body as you do.
6. To come out of the posture, simply straighten your legs and lie there for awhile. Move your pillow under the knees if you want as this helps to reduce stress on the lower back.
Virasana (Child’s Pose)
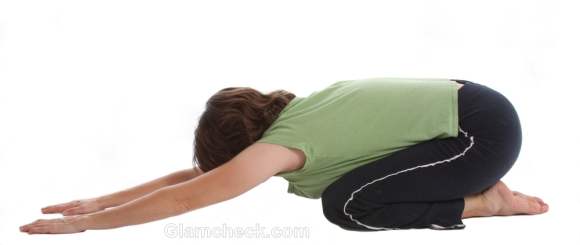 Virasana
This posture helps a lot with back pain as it lengthens the spine and aids in relieving tension from the lower back.
- Sit on your knees with your buttocks on your heels and the back of your feet flat against the ground.
- Keep your toes together but spread the knees to the width of the yoga mat or as much as you comfortably can.
- Lean forward, reaching in front of your with your arms outstretched until your forehead touches the ground. Keep your buttocks against your heels while you do this.
- Breathe. Feel the stretch from the base of your spine to the tips of your fingers. Maintain this pose for 5 breaths. Sit back up slowly when done.
Supta Virasana (Reclining Hero Pose)
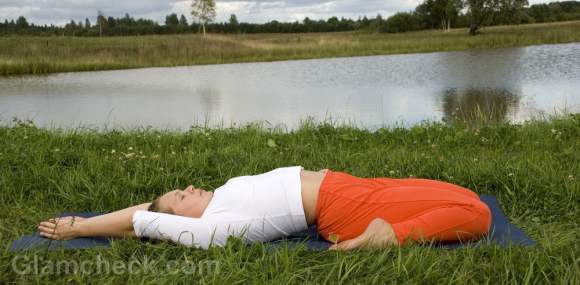 Supta Virasana
This is a very relaxing pose that helps to open up the front of the body and works wonders in arresting stomach cramps as well as back pain if done properly. It’s also great for reducing pain in the legs, especially the thighs and ankles. If you have digestion problems during your period or in general, you can try this pose for relief.
- Kneel down toward the front of your yoga mat. Your knees should be together but your feet should be about hip width apart. So you should be sitting between your feet. Push the flesh of your calf to the side (outward) before settling into this position.
- Now it’s time to lie down but you have to do this step by step so as not to shock your body. Lower yourself onto your elbows first. You’ll start to feel a pull in your thighs. Take deep breaths.
- When the stretch in your thighs is a little more comfortable, you can slowly lie down completely and place your hands by your side with the palms facing upward. You will now feel a pleasant and opening stretch across your thighs and stomach. Continue to take deep breaths. Stay in this position for about 5 minutes.
- If you want to take the stretch a little deeper, raise your hands above your head but your elbows should be no higher than shoulder level.
- To come out, reverse the above steps till you are back to sitting on your knees.
Reclined Spinal Twist
Yoga twists are wonderful for reducing back pain during periods. The reclined spinal twist is one of the simplest and most beneficial poses for period problems. This pose stretches your thighs and calves, lengthens and aligns the spine, and improves blood flow to the pelvis. It is also very calming because the twist massages your spinal cord, which houses your central nervous system.
- Lie down on your back, hands spread out at shoulder height, palms facing the ground. Your legs should be spread hip width apart, knees bent, feet to the floor.
- Lift your buttocks and scooch it to the right. Lower to the ground.
- Draw your knees into your belly and roll them to the left. Take a few deep breaths.
- To come out of this pose, roll back to the center, lower your feet to the ground, raise your hips slightly and scooch your buttocks back into the center.
- Repeat steps 2 and 3, scooching to the left this time and rolling the knees to the right.
Shavasana (Corpse Pose)
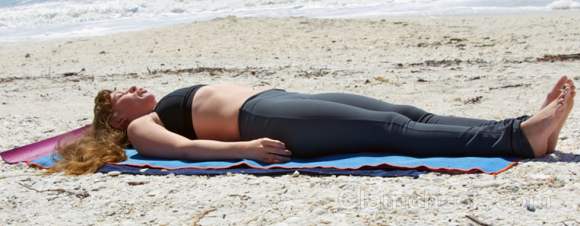 Shavasana
No yoga practice is complete unless you finish your practice properly with the corpse pose. The corpse pose helps your body to integrate the postures you do through your practice. With yoga, the real work happens after you are done with the poses when your body physiologically interprets the signals from your efforts. This cannot happen unless you take the time after your practice to calm your mind and cease all movement. The corpse pose is that time.
Although it may appear just like lying down, the corpse pose is in fact the most difficult one in yoga because it is more mental than physical. It’s about ceasing the thoughts in your head so as to connect with your body on a deeper level. That’s not as easy as it sounds. Try doing it right now and you’ll realize you can’t find the ‘off’ switch to all the chatter in your head. Corpse pose is the time you take during your period to really get in touch with what’s going on inside you on a level beyond words.
- Lie down on your yoga mat, hands about half a foot away from your body at your side, palms facing upward. Close your eyes. Your legs should be outstretched. You’ll be in this position for awhile so make sure you don’t lie down on the bare floor and get extra padding for your head if need be.
- Begin by tensing every part of your body by stretching it for a few seconds. Remain in the same position though. Make your body taut, then release. You’ll immediately feel more relaxed.
- Take three deep breaths, then resume normal breathing.
- Try to feel the tingling in your toes, calves, thighs, pelvis, trunk, hands, fingers and face – the imprint of your practice and the aliveness of the trillions of cells in your body. Do your best to stay connected with this tingling throughout the pose as it will help to reduce the thousands of random thoughts that zoom through your head.
- Slow down your breathing as you get more and more relaxed. Stay in this position for a minimum of five minutes.
- To come out of this pose, begin by slightly moving your toes and fingers.
- Bring your knees into your belly and hold them for a few breaths.
- Roll over to your right side in a foetal position. Bring your hand under your head for support. Stay here for a few breaths.
- Use your hands to push you up into a sitting position. Remain there with your eyes closed, taking a couple of deep breaths. Take your time here. When you are ready, gently and slowly open your eyes.
After the corpse pose, indeed after your yoga practice, you should try to remain in a peaceful state. Do activities that calm you whether it’s reading or tidying clothes or even sleeping. Try to maintain silence, talk in softer tones. Let your movements be mindful.
Image: Shutterstock
