• Skip to main content
  • Skip to secondary menu
  • Skip to primary sidebar
  • Skip to footer
  • Skip to my custom element
Fashion

Fashion

Women Fashion Trends, Makeup and Beauty

Search

Search the site ...
  • Home
  • Fashion
  • Entertainment
  • Health
  • IFE
  • Contact Us
You are here: Home / Makeup & Beauty / Hair / How to Make Dutch Braid in 3 Different Styles

How to Make Dutch Braid in 3 Different Styles

November 5, 2014 by samriddhi

The Dutch braid is a pretty hairdo that can be worn for a number of occasions as well as styled in various ways, so that it suits casual events as well as formal parties. Glamcheck brings you easy steps on how to make the Dutch braid in three different styles.

Simple Dutch Braid

We will start with the most basic style of the Dutch braid. If you can master this, then making other hairstyles around this type of braid won’t be that difficult. So, here are the 5 steps for making the simple Dutch braid.
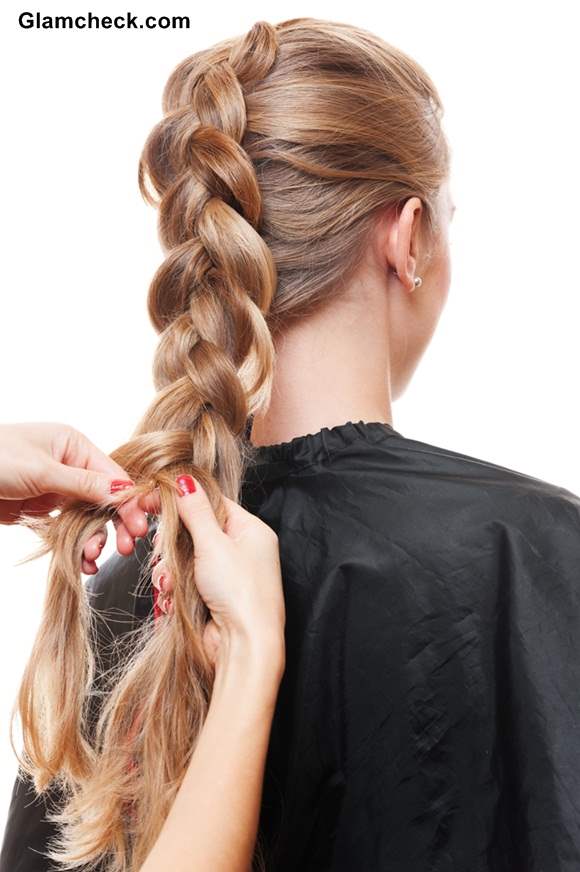
How to Make Dutch BraidHow to Make Dutch Braid

  1. You will be really playing around with the hair, so it is imperative that they flow well and can be parted easily. Therefore, brush your hair nicely to remove all knots and tangles.

  2. Next, divide your hair into three sections, just like you do when you make a normal braid. However, keep the middle section really wide and the other two side sections should be thinner.

  3. Now focus on making a braid with the wide middle part. So once again, you will divide this part into three more sub parts. Next, take the right subpart of hair and place it under the middle section. Similarly, take the left subpart of hair and, again, place it under the middle section. So, in a way, you are actually channeling the way a normal braid is made. However, instead of placing the sections over each other, you simply put them beneath.

  4. Once you have made the first link of the braid using the above step, next you will slowly start to incorporate hair from the two main side parts. So, when you go ahead and make the second link of the braid, add strands of hair from the right main part to the right subpart. And place both of them together under the middle section. Repeat this same step on the other side, using the strands of hair from the left main part and left subpart.

  5. Repeat step 4 until you reach the base of your neck, at which point you will normally run out of strands from the two main side parts to add to the subparts of the middle section. When this happens, proceed by making a simple braid till you reach the end of your hair and then secure it with a hair elastic. And, your Dutch braid is ready.

With a few times of practice, it won’t be long before you become adept at making the simple Dutch braid in a jiffy. Once that happens, you can try out your hand at the more intricate and exquisite versions of it, such as the ones below.

Crown Dutch Braid

Though it looks rather intimidating, the crown style is not all that difficult especially when you know how to make the simple Dutch braid.
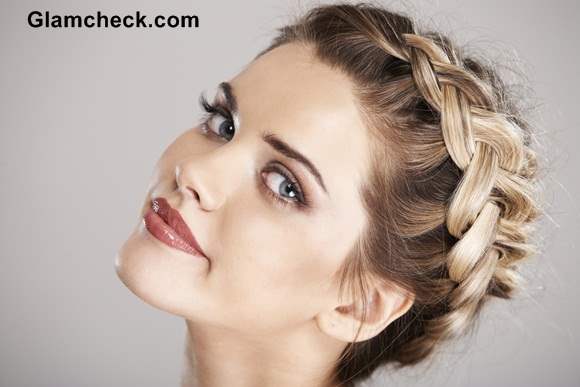
How to Make Crown Dutch BraidHow to Make Crown Dutch Braid

To get started on this, instead of making three parts running down the back of your head, you will create the three sections running from the left side near the crown of your head (just above the ear) to the right side. For girls who are left-handed, do it the other way around ‐ starting from the right to the left.

Now repeat all the steps listed for making the simple Dutch braid with this section of hair that runs across your crown. Once the links of the braid reach the neck area on the side, you can simply make a bun, braid or ponytail with the remaining hair.

Diagonal Dutch Braid

This is yet another variant of the Dutch braid, and you will see that the different styles are created by simple changing the partition and direction of the braid. So in this case, you will make the three sections diagonally across the back of your head. The rest of the steps remain the same as that of making the simple Dutch braid.
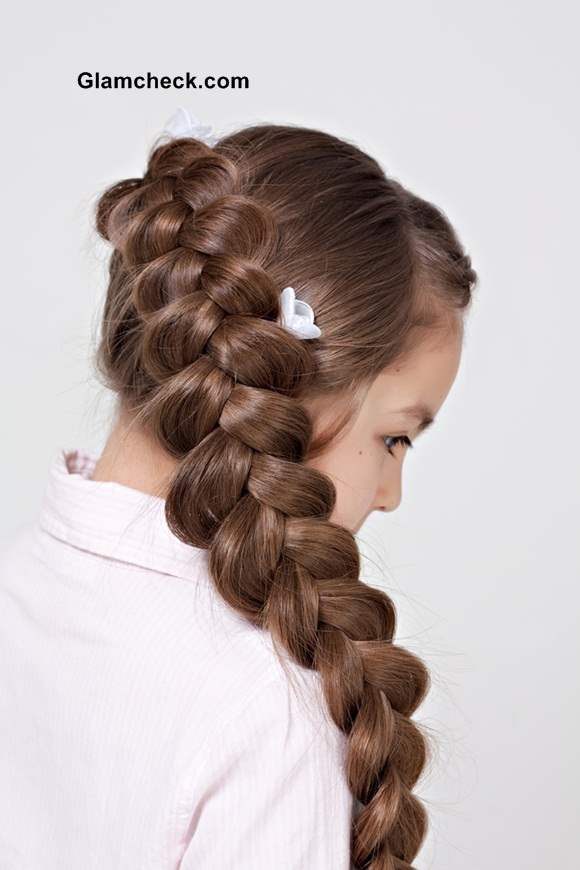
Dutch Braid Variations Diagonal Dutch BraidDutch Braid Variations Diagonal Dutch Braid

You can also add flowers or floral accessories to your Dutch braid hairstyle to make it look prettier and princess like.

If you liked this hairstyle, perhaps you could try out the more elaborate and fancier versions of it such as the two row Dutch braid and its variants.

Image: Shutterstock
Filed Under: Hair Tagged With: Braid Hairstyles, Hairstyle How To


Latest Posts

Viktor & Rolf Spring 2025 Couture

Viktor & Rolf Spring 2025 Couture Collection

Rahul Mishra Spring 2025 Couture Collection

Rahul Mishra Spring 2025 Couture Collection : “The Pale Blue Dot”

Spanx SPANXsculpt ReDefine Denim Collection with Lycra FitSense Technology

Spanx Introduces SPANXsculpt ReDefine Denim Collection with Lycra FitSense Technology

Alanui Spring 2025 Collection

Alanui Spring 2025 Collection – The African Inspiration

Pantone Colour of the Year 2025 Mocha Mousse

Pantone Declares ‘Mocha Mousse’ as Colour of the Year 2025

Accessories

Flower handbag

Sporting Summer Must-have Flower Accessories in Style

Pia Mia 2014 Head Scarf

Pia Mia Sports Head Scarf at “Divergent” Premiere

Style pick colour blocked retro frames Prada fall-2012

Style Pick of the Day: Color Blocked Retro Frames

How to wear the Multiple Rings trend

How to Wear the Multiple Rings Trend

Hoop Earrings for square face shape Julie Moran 2013

To Hoop or Not to Hoop: Should you Wear Julie Moran’s Humongous Earrings

Primary Sidebar

Makeup & Beauty

How to shape eyebrows

How to Shape Eyebrows

Two Ways to Wear The Side Fishtail Braid

Two Ways to Wear The Side Fishtail Braid

In today’s world of rush hours and stress people often stop to give attention to many important things. Pollution, bad water, lack of proper conditioning and chemical treatment can literally kill the life out of hair leaving it dull and without shine. Different weather conditions can affect the hair as well, cool winter winds and the harsh effects of the summer sun. Instead of spending hours and a fortune in a salon, one should consider a frequent hot oil treatment. It sounds like the most simplest of things , but a lot of women in India and many Asian countries swear by it. It restores the lack of moisture in the hair preventing dry hair and breakage. Hot Oil Treatment is easy to prepare, as all it needs is a packet or bottle of oil which can be immersed in hot water. You can also get hot oil treatment kits in the market for a very reasonable price. If time is not in your favour, you can also make a quick stop at a salon for the treatment as they are much more cost efficient than other treatments available Benifits Of Hot Oil Treatment With environmental concern, chemical treatment, poor water conditions and stress affecting most of our lives, we end up with dull, brittle hair. Hot Oil Treatment conditions the hair and is the perfect medicine for damaged hair and improves the hair texture and appearance. Hot Oil Treatment can also help eliminate scalp related problems such as Dandruff and hair fall. It is easy to apply, easy to wash out and the cost of it does not burn a hole through your pocket. What are the different types of oil that can be used? The first step to Hot Oil Treatment is choosing the right oil for your hair. Olive Oil: This oil nourishes and strengthens weak hair and can also help in getting rid of lice. Olive oil also helps with greying and brittle hair, preventing hair loss and making it softer to the touch. It is often used with children as it is safe and very effective at the same time Coconut Oil: The most popular beauty secret of India is coconut oil. It helps in replenishing hair without the need for harmful chemicals. Coconut Oil prevents protein loss, a major factor in lifeless hair, and promotes clean healthy hair. It also has a cooling effect and helps in relaxation and reduction of stress. It also gets rid of dandruff, scalp irritation and restores protein to your locks. Almond Oil: We all know how nutritionally rich almonds are and are often advice by doctors to add them to our diets. Our hair also benefits from almonds, as they help soften the scalp and promote hair growth. Almond oil is rich in vitamin E and deep conditions the hair bringing back life and shine to hair. Jojoba Oil: This oil is used to cleanse and moisturize hair, repairing damage and split ends. It can be used for all hair types, and using jojoba oil for hot oil treatments can act as a deep conditioner with lasting effects. It is believed to be an effective remedy for hair loss as well. How To Prepare Treatment: Hot Oil Treatment is easy to prepare. All you need to do is heat up a few spoons of oil, or immerse the bottle of oil in hot water. If needed you can mix the oil with a tablespoon of honey, which acts as a mask and helps condition the hair even further. After heating, let the oil cool down for some time. Remember, it must be warm but should not burn your scalp. Apply it on your hair either with your hands or a ball of cotton and then run a wide tooth comb through your hair for better results and detangling. Massage your scalp as this stimulates cell growth and circulation for stronger hair. Make sure that all your hair is evenly covered with the oil and wrap your hair in a warm towel for 30-45 minutes to help the oil penetrate the hair deeper, following which you can leave the oil in your hair overnight for better results. Wash your hair with lukewarm water, avoiding both too hot and too cold and notice the difference immediately. Keep consistently treating your hair and you’ll see improvement in no time. Experiment with different oils to see which works for you the best!

Hot Oil Treatment for Hair

Tropical Nail Art DIY flowers

Tropical Nail Art DIY – Easy and Quick Flower Nail Art

Celebrity Hair Color - Jessica Biel Turns Ombre

Celebrity Hair Color – Jessica Biel Turns Ombre


Style Pick

style pick leopard print jumpsuit

Style Pick of the Day – Rebecca Minkoff Leopard Print Jumpsuit

Style pick of the day tailored jumpsuit tommy hilfiger

Style Pick of The Day: Tailored Jumpsuit by Tommy Hilfiger

Pink ball gown s-s 2013 Zang Toi

Style Pick of the Day: Fairytale Ball Gowns for S/S 2013

Fashion

  • Celebrity Style
  • Fashion Accessories
  • Fashion Clothing
  • Fashion Faux Pas
  • Fashion Footwear
  • Fashion Trends – Fall / Winter
  • Fashion Trends – Spring / Summer
  • Hair
  • Makeup
  • News
  • Skin & Body
  • Street Style

Footer

Site Information

  • Privacy Policy

Copyright © 2026 Glamcheck.